In many houses in Tennessee I've seen this done and done well. I even lived in two apartments in two very different areas of the state that were set up that way. No ceiling light fixtures but wall switches that operated outlets. It's fine. It works.
Until you live in a state where many many months of the year it is dark and cold outside. And grey. Like here. Northern Wisconsin.
So while I've been at yard sales recently I have looked over lamps like they were worth their weight in gold. I need so many that rushing out to a box store and buying them doesn't really appeal to me or my wallet.
And then I found these two for a dollar each at a church rummage sale. The cords were sad, not grounded and strait up scary.
And then I was at Walmart of all places and found this. I think it was six or seven dollars. Not too much.
And it had instructions!
The only catch was I had to tear the felt off the bottom of my lamp. I left as much around the edges (to protect table tops) as I could and when I'm next at a craft store I'll just pick up some to put on the bottom again. It wasn't hard because these lamps are quite old.
See the nut in there? I had to reach in and unscrew it.
Go go Gadget girly hands! After unscrewing it I cut the old electric cord and pulled everything out of and off the ceramic base. I also used the opportunity to wash them in warm soapy water.
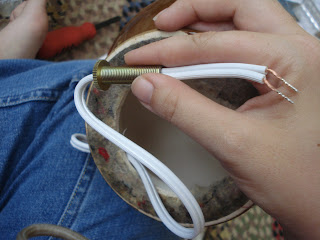
Next I put the new cord through the hole in the base and then through the new threaded pipe that would attach to the top. I put the screw on piece low on the pipe because the neck of this lamp is rather long. Honestly the kit was made to turn *anything* into a lamp but I wanted the wiring to run out the back like it did originally.
Then I pushed the through the neck of the lamp.
Next step was fitting this fantastic metal piece over the top lip of the ceramic base and adding the base of the bit that holds the bulb. (Love my technical terms?)
The next step was to tie the wires in a knot. Funny, as I took apart the lamps they were not tied in a knot. But hey a lot has changed regarding fire safety since the 60's. In this picture you can see the back hole on the base where the cord is designed to run out if you're turning something like a champaign bottle into a lamp. Or if you live near me possibly a beer bottle with some sort of Packers related theme. For the memories.
Next step was curling the ends of the wire into little hooks. I took one look at the diagram and realized my curling pliers for jewelry making would be perfect! Those of you following along at home maybe wanna try some needle nosed pliers.
And then following the directions you attach one wire to the brass screw and one wire to the silver screw. One piece of the plastic wire cover is ridged and one is smooth so that you know which one needs to be attached to which screw.
Then you push this assembly down into the cardboard bit you should have detached in order to put the wires on and finally push the whole mess down into the base and TA-DA you made a lamp!
Now run and find a lamp shade that isn't really the right size or shape and put the on the lamp, install a bulb, plug it up and if it comes on do a happy dance!
::dance dance dance::
Honestly this was so easy and soooo step by step* that I'm kinda kicking myself for not picking up more old lamps. I've always been nervous that they would be a fire hazard but it was so super easy you better believe I'll be surfing yard sales with more interest now.
*Bonus points for you if you noticed that in the upper picture the lamp has a longer metal neck above the ceramic bit. I wanted to reuse those but unfortunately my new grounded super wire was too thick to go through the metal neck, so these lamps are just a smidgin shorter. And honestly with a shade you can't tell. Once I get nice retro circular lampshades all weirdness should go away.


.JPG)


1 comment:
This is great, I need to do this with another lamp myself!
Post a Comment